Wednesday, December 10, 2014

Paw Print Stocking :)

I found this free pattern to make my doggie a stocking that is not too big or too small.
The stocking came out to be perfect size, and it's adorable! I did a different edging by the way than the pattern calls for.


Free Ravelry Download: Paw Print Pet Present Pouch

This pattern makes a shorter version of the Red Heart's Dog Paws Christmas Stocking pattern. There is also Cat Paws Christmas Stocking pattern.

The pattern was easy to follow and no errors! :) It took me about 2 hours to complete it.

On to make more stockings! My birdies need one too. :D

Sunday, December 07, 2014

Crocheted Stockings

This year, I got so tired of looking at store bought stockings so I crocheted us some! :)


Free pattern on Love City blog:
http://www.lovecityblog.com/2012/12/crochet-love-christmas-stockings.html#.VISXADHF-So 


This pattern is very versatile.  You can make it bigger/smaller by making more/less stitches on step 1 and working more/less rounds.  The same can be done by using yarn in different weight.

I crocheted mine with 2 strands of worsted weight wool yarn held together and a size K hook and spent about an hour to complete one. :)
This pattern is not written as in traditional crochet patterns.

I didn't follow the pattern exactly: First of all, I started out with the magic loop/ring method instead of ch 5 and sl st to create a ring. This is a toe-up stocking pattern.  On step 5, I repeated step 4 for 6 more rounds.  Step 6 - 8 create the heel.  I crocheted less rounds for shorter stockings.  I increased 2 stitches on each of the last 2 rounds to make the stocking look more after-worn. - This also makes it easy to stuff them with goodies! :D  As I worked on the last round, I added a loop with chains and sl st.  On my stocking (the center one), I made the frill for the last round with basic crochet stitches with different height. (ex. sc -> hdc -> dc -> tr -> dc -> hdc -> sc)  There are many other ways to achieve lacey look so have fun with it! :)

Tuesday, November 04, 2014

Skinny Crochet Icicle Scarf - FREE PATTERN

It's been way too long since I last wrote my own pattern..., but another one is finally here! :)

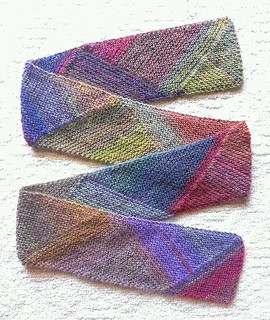
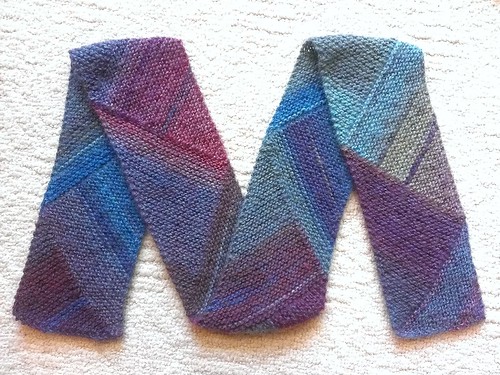
This beautiful DK weight yarn was screaming exactly what it wanted to be....  a gorgeous scarf that's perfect for the winter holiday.  The yarn is Red Heart Boutique 
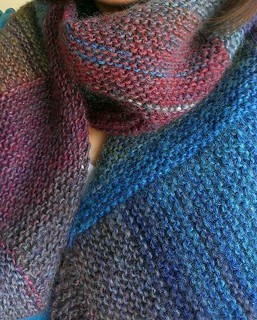
Swanky.  This yarn creates soft,  drapey, and slinky fabric that feels so good around the neck.  It has the oval shape sequins that allow surprisingly smooth crochet which I enjoyed so much.

This scarf definitely will not be hiding in my closet this winter!


*Click images to enlarge*


Yarn I used:  Red Heart Boutique Swanky

Visit Red Heart Amazon site to find more beatiful yarn!: http://www.redheart.com/yarn


Here is the pattern!  Hope you like it. :)

********************************************
Skinny Crochet Icicle Scarf
~ This pattern is for personal, non-commercial use only ~

The scarf is consisted mainly of slanted rows of double crochet stitches instead of the basic horizontal rows.  You can use any drapey yarn and a hook suggested on its yarn label.  The width and the length can be easily adjusted by adding/reducing numbers of stitches and rows.  I also edged the scarf to hide not-so-attractive sides of double crochet rows!  If you use the featured yarn, you will only need 1 ball!


Dimentions:
  • Approximately 3 3/4"W X 60"L


Materials:
  • US H8 / 5mm hook or other size suggested on the label of the yarn you are using
  • (1) Red Heart Boutique Swanky in Sterling (202 yd, 3.5 oz, 62% acrylic 38% polyester) or any other drapey yarn
  • Tapestry needle


Notes:
  • YO - Yarn Over
  • dc2tog - [YO, insert hook in next st, pull up a lp, YO, pull lp through 2 lps on hook] twice, YO, pull lp through remaining 3 lps on hook
  • RS - Right Side
  • WS - Wrong Side


SCARF BODY:

Ch 4.
Row 1: Dc in the 4th ch from hook, 2 dc in the same ch. Turn. - 3 sts
Row 2: Ch 3 (count as first dc), dc in the same st, dc in next st, 2 dc in top of 3-ch.  Turn. - 5 sts
Row 3: Ch 3 (count as first dc), dc in the same st, dc in each of next 3 sts, 2 dc in top of 3-ch. Turn - 7 sts
Row 4 - 8: Work these rows in the same manner increasing 1 dc in the first and last sts of each row until there are 17 sts. - You can make this scarf wider/narrower by adding/reducing rows, but make sure you have odd number of stitches! Once you decide the width of your scarf, make sure you have the same # of stitches on all the rest of the rows. (Don't skip the top of 3-ch/first dc!)
Row 9: Ch 3 (count as first dc), dc in same st, dc in each st until 2 sts remain, dc2tog in next 2 sts. Turn. - 17 sts
Row 10: Ch 2, YO, insert hook in next st, YO, pull up a lp, YO, pull lp through 2 lps on hook, YO, pull lp through remaining 2 lps on hook, dc in each of next 14 sts, 2 dc in last st. Turn. - 17 sts

Repeat Row 9 - 10 until you have 85 rows. Do not turn.  Mark the facing side of the scarf with a clip marker as RS (Right Side). - You can make your scarf longer/shorter by doing more/less rows.


SCARF BODY EDGING:
Let's edge around the Scarf Body, starting with the long side of the scarf right next to the last stitch.  Do not chain tightly.

1st Long Side:  Ch 2, sc in the SIDE of the same row (= wrap the last dc from the side with sc), *ch 2, sc in next row, rep from * until you worked the last row. Ch 2.

1st Short Side:  Sc in top of the corner st, ch 2, sc in the side of the same row. Repeat [ch 2, sc in next row] until last row is worked, ch 2, sc in top of the other corner edge.

2nd Long Side:  Repeat 1st Long Side.

2nd Short Side:  Sc in top of the corner st, repeat [ch 2, sk next st, sc in next st] to the last st. Turn. - (8) 2-ch spaces


LACE EDGING:
Start with the 2nd Short Side.

Row 1 (WS): Ch 1, sc in same st, ch 3, sc in next 2-ch sp, repeat [ch 5, sc in next 2-ch sp] to the last 2-ch sp, ch 3, sc in top of the last st. Turn. - If you had 17 sts as mine on the Scarf Body rows, you should have 9 ch-sps.
Row 2 (RS): Sl st in 3-ch space, ch 1, repeat [ch 5, sl st in 3rd ch from hook (picot made), ch 2, sc in next ch sp] until the last 3-ch sp is worked.  Fasten off.


Repeat Row 1 & 2 on the 1st Short Side (opposite short side of the scarf) by joining yarn in the first stitch on WS (Wrong Side) of the scarf.


You are done crocheting this scarf, and there is just one more thing to do - Blocking. :)  Please don't skip it because good blocking relaxes the stitches and really brings out the beauty of the scarf!

*******************************************


If you have any questions on this pattern, please comment on this post / Facebook / Ravelry. :)


Your support will help me keep offering free patterns.
Thank you and happy stitching!

Saturday, October 25, 2014

"Multidirectional Diagonal Scarf" No.2 !!!


I just finished my 2nd Multidirectional Diagonal Scarf! :)

"Multidirectional Diagonal Scarf"

"Multidirectional Diagonal Scarf" by Karen Baumer
This is a FREE download on Ravelry!

This time, I again used Lion Brand Amazing but in 2100 Wild Flowers. And guess what... I'm working on the 3rd in one color - gray.  It's going to be hubby's!  He can use it for motorcycling when it gets cold, and I'm hoping it will remind him to ride carefully. :)

Sunday, October 12, 2014

Crocheted Pumpkins

The fall is here, and I see pumpkins everywhere! I crocheted my pumpkins back in 2006. :)

Pumpkins 

My original post is here.  Unforutnately, this pattern is no longer available, but I found another cute on on PlanetJune. :)

Wednesday, October 08, 2014

"Multidirectional Diagonal Scarf"

Fall seems to have finally arrived here, and of course, my urge for playing with yarn hit. :D
I finished this scarf!

*Click to enlarge*
Multidirectional Diagonal Scarf

  "Multidirectional Diagonal Scarf"

"Multidirectional Diagonal Scarf" by Karen Baumer
This is a FREE download on Ravelry!


My yarn of choice was Lion Brand Amazing in 2011 Glacier Bay.   Glacier Bay... I'm sure every time I wrap this scarf around my neck, I'll be daydreaming about Alaska, the land I've never stepped into.   I even like just saying "Glacier Bay" for some reason. :D


The multi-directional rows of this scarf really accentuate the color shifts in this yarn.  This pattern requires only knit stitches (no purling y'all!), and basic increasing & decreasing.  Also, no counting is necessary for the most part of it (who wouldn't love that!).

My scarf has 32 stitches for 5" width with #9 needles.  I used almost all 2 skeins, and it was enough to have a good length.  I've already been working on my 2nd in a different colorway! :)

Friday, June 20, 2014

This is my 3rd!

I keep coming back to this same pattern.
I just love this doily, and this is my third! I'm really liking these colors. :)

Square Center Doily

Friday, February 21, 2014

Cowl for a Friend

I knitted a cowl for a good friend back in October...  (I know, I know... it's now February of the new year, and my last post here was a year ago!  XD)

"Silkie" Cowl
Pattern:  "Silkie" by Gudrun Johnston - Purchased at Ravelry

Yarn: Quince and Co. Osprey in Delft 108

I started with provisional/chain cast-on to finish this snood with 3-needle bind-off. - If you don't know what I'm talking about here and really want to learn knitting, visit KnittingHelp.com :)
I'm a huge fan of the I-cord edge of this cowl (smooth, beautiful side edges!), and not having to use a cable needle to create this stitch pattern was a plus!  It was quick and the stitch pattern was not boring or too complex. :)

Oh, and I have another scarf in progress, and I won't be long before I post it here, I promise! :D